Concurrency: A User-Centric Approach
Introduction
In this chapter, we study parallel and distributed computing topics from a user-centric software development angle, focusing on the authors’ research and experience in concurrency. While the focus of this chapter is largely within the device itself, the online source code for our examples goes beyond the on-device experience by providing versions that connect to RESTful web services (optionally hosted in the cloud) [Christensen2009]. We’ve deliberately focused this chapter around the on-device experience, consistent with “mobile first” thinking, which more generally is the way the “internet of things” also works [Ashton2009]. This thinking results in proper separation of concerns when it comes to the user experience, local computation, and remote interactions (mediated using web services).
It is worth taking a few moments to ponder why mobile platforms are interesting from the standpoint of parallel and distributed computing, even if at first glance it is obvious. From an architectural point of view, the landscape of mobile devices has followed a similar trajectory to that of traditional multiprocessing systems. The early mobile device offerings, especially when it came to smartphones, were single core. At the time of writing, the typical smartphone or tablet is equipped with at least two cores but four are becoming common. In this vein, it almost goes without saying that today’s devices are well on their way to being serious parallel systems in their own right. (In fact, in the embedded space, there has been a corresponding emergence of parallel boards, similar to the Raspberry Pi.)
The state of parallel computing today largely requires the mastery of two styles, often appearing in a hybrid form. task parallelism and data parallelism. The emerging mobile devices are following desktop and server architecture by supporting both of these. In the case of task parallelism, to get good performance, especially when it comes to the user experience, concurrency must be disciplined. An additional constaint placed on mobile devices, compared to parallel computing, is that unbounded concurrency (threading) makes the device unusable/unresponsive, even to a greater extent than on desktops and servers (where there is better I/O performance in general). We posit that learning to program concurrency in a resource-constrained environment (e.g. Android smartphones) can be greatly helpful for writing better concurrent, parallel, and distributed code in general. More importantly, today’s students really want to learn emerging platforms, so it is a great way to develop new talent in languages/systems that are likely to be used in future parallel/distributed programming environments.
In this chapter, we begin by examining with a simple interactive behavior and explore how to implement this using the Android mobile application development framework. To the end of making our presentation relevant to problem solvers, our running example is a bounded click counter application (much more interactive and exciting than the examples commonly found in concurrency textbooks, e.g., atomic counters, bounded buffers, dining philosophers) that can be used to keep track of the capacity of, say, a movie theater.
We then focus on providing a richer experience by introducing timers and internal events, which allow for more interesting scenarios to be explored. For example, a countdown timer can be used for notification of elapsed time, a concept that has almost uniquely emerged in the mobile space but has applications in embedded and parallel computing in general, where asynchronous paradigms have been present for some time, dating to job scheduling, especially for longer-running jobs.
We close by exploring longer-running, CPU-bound activities. In mobile, a crucial design goal is to ensure UI responsiveness and appropriate progress reporting. We demonstrate strategies for ensuring computation proceeds but can be interrupted. The methods shown here are generalized to offline code (beyond the scope of this chapter) for interfacing with cloud-hosted web services.
Basic Event-Based User Interaction
Learning objectives
- User interaction in console applications (C)
- User interaction in GUI applications (C)
- State-dependent behavior and user interaction (C)
- Basics of the Android GUI framework (A)
- Understanding user interaction as events (C)
- The Dependency Inversion Principle (DIP) (C)
- The Observer design pattern (C)
- Modeling simple behaviors with UML State Machine diagrams (A)
- Modeling execution scenarios with UML Sequence diagrams (A)
- The Model-View-Adapter (MVA) architectural pattern (C)
- Testing interactive applications (A)
Introduction
In this section, we’ll start with a simple interactive behavior and explore how to implement this using the Android mobile application development framework [Android]. Our running example will be a bounded click counter application that can be used to keep track of the capacity of, say, a movie theater.
The bounded counter abstraction
A bounded counter [OS], the concept underlying this application, is an integer counter that is guaranteed to stay between a preconfigured minimum and maximum value. This is called the data invariant of the bounded counter.
We can represent this abstraction as a simple, passive object with, say, the following interface:
1 2 3 4 5 6 7 | public interface BoundedCounter {
void increment();
void decrement();
int get();
boolean isFull();
boolean isEmpty();
}
|
In following a test-driven mindset [TDD], we would test implementations of this interface using methods such as this one, which ensures that incrementing the counter works properly:
1 2 3 4 5 6 7 8 | @Test
public void testIncrement() {
decrementIfFull();
assertFalse(counter.isFull());
final int v = counter.get();
counter.increment();
assertEquals(v + 1, counter.get());
}
|
In the remainder of this section, we’ll put this abstraction to good use by building an interactive application on top of it.
The functional requirements for click counter device
Next, let’s imagine a device that realizes this bounded counter concept. For example, a bouncer positioned at the door of a movie theater to prevent overcrowding, would require a device with the following behavior:
- The device is preconfigured to the capacity of the venue.
- The device always displays the current counter value, initially zero.
- Whenever a person enters the movie theater, the bouncer presses the increment button; if there is still capacity, the counter value goes up by one.
- Whenever a person leaves the theater, the bouncer presses the decrement button; the counter value goes down by one (but not below zero).
- If the maximum has been reached, the increment button either becomes unavailable (or, as an alternative design choice, attempts to press it cause an error). This behavior continues until the counter value falls below the maximum again.
- There is a reset button for resetting the counter value directly to zero.
A simple graphical user interface (GUI) for a click counter
Let’s now flesh out the user interface of this click counter device. In the case of a dedicated hardware device, the interface could have tactile inputs and visual outputs, along with, say, audio and haptic outputs.
As a minimum, we would require these interface elements:
- Three buttons, for incrementing and decrementing the counter value and for resetting it to zero.
- A numeric display of the current counter value.
Optionally, we would benefit from different types of feedback:
- Beep and/or vibrate when reaching the maximum counter value.
- Show the percentage of capacity as a numeric percentage or color thermometer.
Instead of a hardware device, we’ll now implement this behavior as a mobile software app, so let’s focus first on the minimum interface elements. In addition, we’ll make the design choice that operations that would violate the counter’s data invariant are disabled.
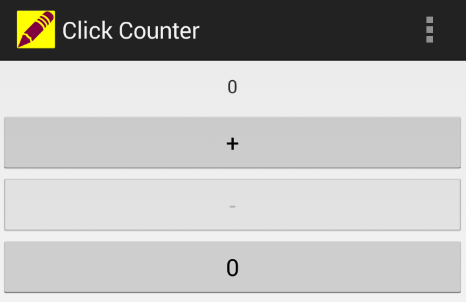
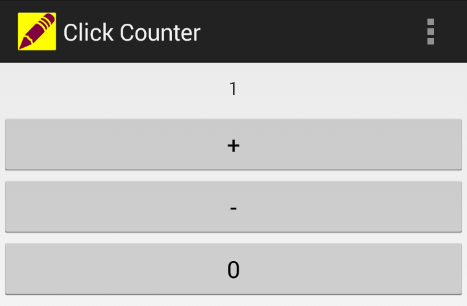
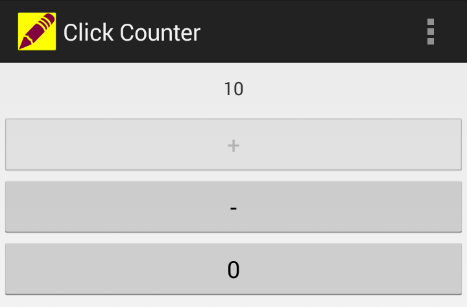
These decisions lead to the three view states for the bounded click counter Android app: In the initial (minimum) view state, the decrement button is disabled (see figure Minimum view state). In the counting view state of the, all buttons are enabled (see figure Counting view state). Finally, in the maximum view state, the increment button is disabled (see figure Maximum view state; we assume a maximum value of 10). In our design, the reset button is always enabled.
Understanding user interaction as events
It was fairly easy to express the familiar bounded counter abstraction and to envision a possible user interface for putting this abstraction to practical use. The remaining challenge is to tie the two together in a meaningful way, such that the interface uses the abstraction to provide the required behavior. In this section, we’ll work on bridging this gap.
Modeling the interactive behavior
As a first step, let’s abstract away the concrete aspects of the user interface:
- Instead of touch buttons, we’ll have input events.
- Instead of setting a visual display, we’ll modify a counter value.
After we take this step, we can use a UML state machine diagram [UML] to model the dynamic behavior we described at the beginning of this section more formally. Note how the touch buttons correspond to events (triggers of transitions, i.e., arrows) with the matching names.
The behavior starts with the initial pseudostate represented by the black circle. From there, the counter value gets its initial value, and we start in the minimum state. Assuming that the minimum and maximum values are at least two apart, we can increment unconditionally and reach the counting state. As we keep incrementing, we stay here as long as we are at least two away from the maximum state. As soon as we are exactly one away from the maximum state, the next increment takes us to that state, and now we can no longer increment, just decrement. The system mirrors this behavior in response to the decrement event. There is a surrounding global state to support a single reset transition back to the minimum state.

The UML state machine diagram modeling the dynamic behavior of the bounded counter application.
As you can see, the three model states map directly to the view states from the previous subsection, and the transitions enabled in each model state map to the buttons enabled in each view state. This is not always the case, though, and we will see examples in a later section of an application with multiple model states but only a single view state.
Note
A full introduction to the Unified Modeling Language (UML) [UML] would go far beyond the scope of this chapter. Therefore, we aim to introduce the key elements of UML needed here in an informal and pragmatic manner. Various UML resources, including the official specification, are available at http://www.uml.org/. Third-party tutorials are available online and in book form.
GUI widgets as event sources
For developing GUI applications, it can be quite convenient to use an integrated development environment (IDE) with support for the GUI framework we are targeting. In the case of Android, owner Google provides Android Studio, a freely available customized version of JetBrains IntelliJIDEA (http://developer.android.com/sdk/installing/studio.html).
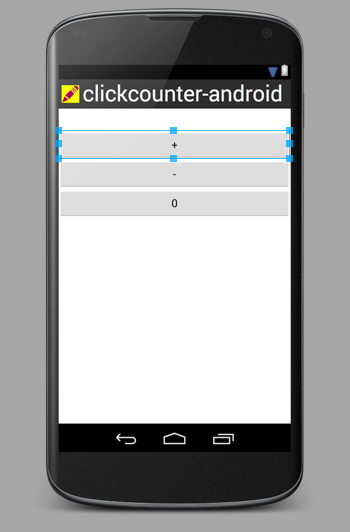
Besides the usual IDE features, such as code comprehension, navigation, editing, building, and testing, there is support for the visual design of the interface by direct manipulation of components such as buttons, labels, text fields, layouts, etc. In Android Studio, this includes a view component editor with a graphical view, underlying XML source view, and corresponding component tree view. There is also an editor for setting a view component’s specific visual and behavioral properties.
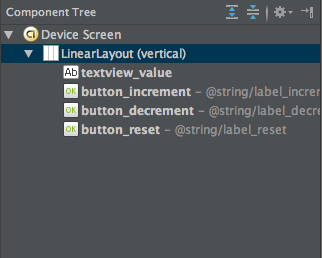
Figure Component editor view shows the visual interface of the click counter application in the Android Studio view component editor with the increment button selected. Figure Component tree view shows the corresponding hierarchy of view components as a tree.
Our next step is to bring the app to life by connecting the visual interface with the interactive behavior. For example, when pressing the increment button in a non-full counter state, we expect the displayed value to go up by one. In general, the user can trigger certain events by interacting with view components and other event sources. For example, one can press a button, swiping one’s finger across the screen, rotate the device, etc.
Event listeners and the Observer pattern
We now discuss what an event is and what happens after it gets triggered. We will continue focusing on our running example of pressing the increment button.
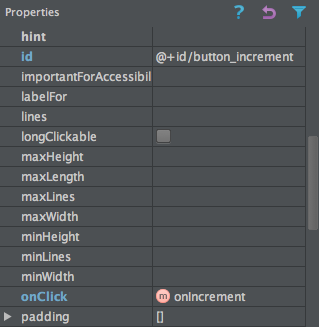
This figure shows the selected increment button in the view component property editor. Most importantly, the onClick event, which occurs when the user presses this button, maps to invocations of the onIncrement method in the associated activity instance.
The visual representation of an Android GUI is generated from an XML source. For example, the source element for our increment button looks like this. It textually maps the onClick attribute to the onIncrement method in the associated activity instance.
1 2 3 4 5 6 | <Button
android:id="@+id/button_increment"
android:layout_width="fill_parent"
android:layout_height="wrap_content"
android:onClick="onIncrement"
android:text="@string/label_increment" />
|
The association with an instance of a particular activity class is declared separately in the app’s Android manifest. The top-level manifest element specifies the Java package of the activity class, and the activity element on line 5 specifies the name of the activity class, ClickCounterActivity.
1 2 3 4 5 6 7 8 9 10 11 12 | <manifest xmlns:android="http://schemas.android.com/apk/res/android"
package="edu.luc.etl.cs313.android.clickcounter" ...>
...
<application ...>
<activity android:name=".ClickCounterActivity" ...>
<intent-filter>
<action android:name="android.intent.action.MAIN" />
<category android:name="android.intent.category.LAUNCHER" />
</intent-filter>
</activity>
</application>
</manifest>
|
So an event is just an invocation of an event listener method, possibly with an argument describing the event. We first need to establish the association between an event source and one (or possibly several) event listener(s) by subscribing the listener to the source. Once we do that, every time this source emits an event, normally triggered by the user, the appropriate event listener method gets called on each subscribed listener.
Unlike ordinary method invocations, where the caller knows the identity of the callee, the (observable) event source provides a general mechanism for subscribing a listener to a source. This technique is widely known as the Observer design pattern [GOF].
Many GUI frameworks follow this approach. In Android, for example, the general component superclass is View, and there are various types of listener interfaces, including OnClickListener. In following the Dependency Inversion Principle (DIP) [APPP], the View class owns the interfaces its listeners must implement.
1 2 3 4 5 6 7 8 | public class View {
...
public static interface OnClickListener {
void onClick(View source);
}
public void setOnClickListener(final OnClickListener listener) { ... }
...
}
|
Android follows an event source/listener naming idiom loosely based on the Javabeans specification [JavaBeans]. Listeners of, say, the onX of event implement the OnXListener interface with the onX(Source source) method. Sources of this kind of event implement the setOnXListener method. An actual event instance corresponds to an invocation of the onX method with the source component passed as the source argument.
Note
Those readers who have worked with GUI framework that supports multiple listeners, such as Swing, might initially find it restrictive of Android to allow only one. We’ll leave it as an exercise to figure out which well-known software design pattern can be used to work around this restriction.
Processing events triggered by the user
The Android activity is responsible for mediating between the view components and the POJO (plain old Java object) bounded counter model we saw above. The full cycle of each event-based interaction goes like this. By pressing the increment button, the user triggers the onClick event on that button, and the onIncrement method gets called. This method interacts with the model instance by invoking the increment method and then requests a view update of the activity itself. The corresponding updateView method also interacts with the model instance by retrieving the current counter value using the get method, displays this value in the corresponding GUI element with unique ID textview_value, and finally updates the view states as necessary.
1 2 3 4 | public void onIncrement(final View view) {
model.increment();
updateView();
}
|
1 2 3 4 5 6 7 | protected void updateView() {
final TextView valueView = (TextView) findViewById(R.id.textview_value);
valueView.setText(Integer.toString(model.get()));
// afford controls according to model state
((Button) findViewById(R.id.button_increment)).setEnabled(!model.isFull());
((Button) findViewById(R.id.button_decrement)).setEnabled(!model.isEmpty());
}
|
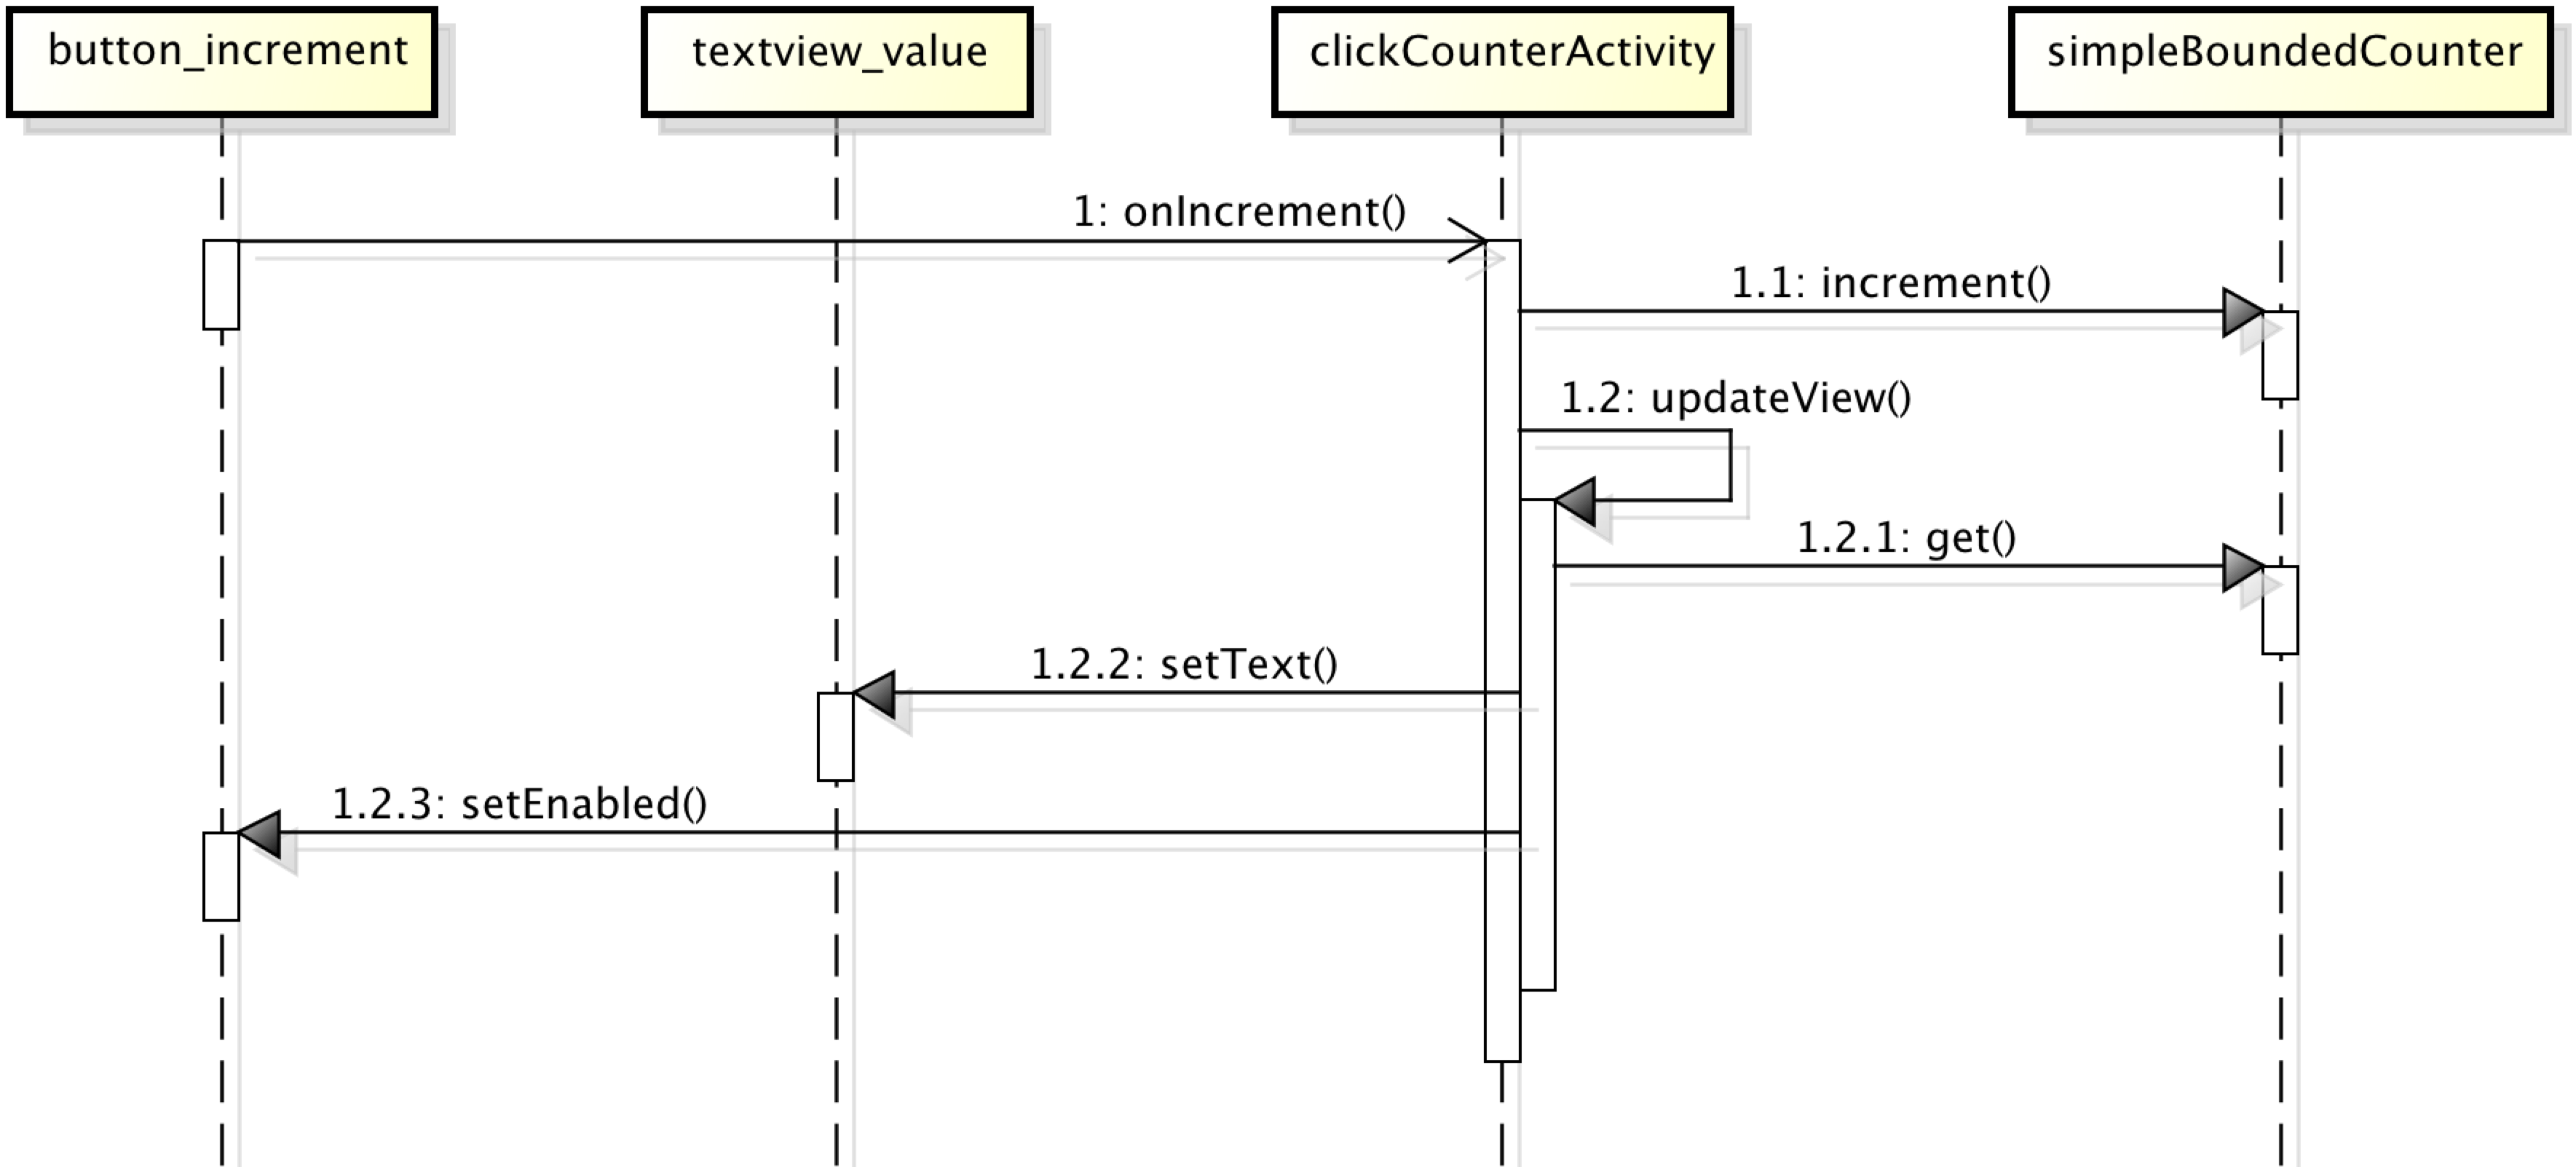
This UML sequence diagram shows the full event-based interaction cycle in response to a press of the increment button. Stick arrow heads represent events, while solid arrow heads represent method invocations.
What happens if the user presses two buttons at the same time? The GUI framework responds to at most one button press or other event trigger at any given time. While the GUI framework is processing an event, it places additional incoming event triggers on a queue and fully processes each one in turn. Specifically, only after the event listener method handling the current event returns will the framework process the next event. (Accordingly, activation boxes of different event listener method invocations in the UML sequence diagram must not overlap.) This approach is called single-threaded event handling. It keeps the programming model simple and avoids problems such as race conditions or deadlocks that can arise in multithreaded approaches.
Application architecture
This overall application architecture, where a component mediates between view components and model components, is known as model-view-adapter (MVA) [MVA], where the adapter component mediates all interactions between the view and the model. (By contrast, the model-view-controller (MVC) architecture has a triangular shape and allows the model to update the view(s) directly via update events.) The figure below illustrates this architecture. The solid arrows represent ordinary method invocations, and the dashed arrow represents event-based interaction. View and adapter play the roles of observable and observer, respectively, in the Observer pattern that describes the top half of this architecture.
System-testing GUI applications
Automated system testing of entire GUI applications is a broad and important topic that goes beyond the scope of this chapter. Here, we complete our running example by focusing on a few key concepts and techniques.
We distinguish between our application code, usually referred to as the system under test (SUT), and the test code. Test coverage describes the extent to which our test code exercises the SUT, and there are several ways to measure test coverage. We generally want test coverage to be as close to 100% as possible and can measure this using suitable tools.
At the beginning of this section, we already saw an example of a simple component-level unit test method for the POJO bounded counter model. Because Android view components support triggering events programmatically, we can also write system-level test methods that mimic the way a human user would interact with the application.
System-testing the click counter
The following test handles a simple scenario of pressing the reset button, verifying that we are in the minimum view state, then pressing the increment button, verifying that the value has gone up and we are in the counting state, pressing the reset button again, and finally verifying that we are back in the minimum state.
1 2 3 4 5 6 7 8 9 10 11 12 13 14 15 16 17 18 19 | @Test
public void testActivityScenarioIncReset() {
assertTrue(getResetButton().performClick());
assertEquals(0, getDisplayedValue());
assertTrue(getIncButton().isEnabled());
assertFalse(getDecButton().isEnabled());
assertTrue(getResetButton().isEnabled());
assertTrue(getIncButton().performClick());
assertEquals(1, getDisplayedValue());
assertTrue(getIncButton().isEnabled());
assertTrue(getDecButton().isEnabled());
assertTrue(getResetButton().isEnabled());
assertTrue(getResetButton().performClick());
assertEquals(0, getDisplayedValue());
assertTrue(getIncButton().isEnabled());
assertFalse(getDecButton().isEnabled());
assertTrue(getResetButton().isEnabled());
assertTrue(getResetButton().performClick());
}
|
The next test ensures that the visible application state is preserved under device rotation. This is an important and effective test because an Android application goes through its entire lifecycle under rotation.
1 2 3 4 5 6 7 8 9 10 11 12 13 14 | @Test
public void testActivityScenarioRotation() {
assertTrue(getResetButton().performClick());
assertEquals(0, getDisplayedValue());
assertTrue(getIncButton().performClick());
assertTrue(getIncButton().performClick());
assertTrue(getIncButton().performClick());
assertEquals(3, getDisplayedValue());
getActivity().setRequestedOrientation(ActivityInfo.SCREEN_ORIENTATION_LANDSCAPE);
assertEquals(3, getDisplayedValue());
getActivity().setRequestedOrientation(ActivityInfo.SCREEN_ORIENTATION_PORTRAIT);
assertEquals(3, getDisplayedValue());
assertTrue(getResetButton().performClick());
}
|
System testing in and out of container
We have two main choices for system-testing our app:
- In-container/instrumentation testing in the presence of the target execution environment, such as an actual Android phone or tablet emulator (or physical device). This requires deploying both the SUT and the test code to the emulator and tends to be quite slow. So far, Android’s build tools officially support only this mode.
- Out-of-container testing on the development workstation using a test framework such as Robolectric that simulates an Android runtime environment tends to be considerably faster. This and other non-instrumentation types of testing can be integrated in the Android build process with a bit of extra effort.
Although the Android build process does not officially support this or other types of non-instrumentation testing, they can be integrated in the Android build process with a bit of extra effort.
Structuring test code for flexibility and reuse
Typically, we’ll want to run the exact same test logic in both cases, starting with the simulated environment and occasionally targeting the emulator or device. An effective way to structure our test code for this purpose is the xUnit pattern Testcase Superclass. As the pattern name suggests, we pull up the common test code into an abstract superclass, and each of the two concrete test classes inherits the common code and runs it in the desired environment.
1 2 3 4 | @RunWith(RobolectricTestRunner.class)
public class ClickCounterActivityRobolectric extends AbstractClickCounterActivityTest {
// some minimal Robolectric-specific code
}
|
The official Android test support, however, requires inheriting from a specific superclass called ActivityInstrumentationTestCase2. This class now takes up the only superclass slot, so we cannot use the Testcase Superclass pattern literally. Instead, we need to approximate inheriting from our AbstractClickCounterActivityTest using delegation to a subobject. This gets the job done but can get quite tedious when a lot of test methods are involved.
1 2 3 4 5 6 7 8 9 10 11 12 | public class ClickCounterActivityTest
extends ActivityInstrumentationTestCase2<ClickCounterActivity> {
...
// test subclass instance to delegate to
private AbstractClickCounterActivityTest actualTest;
@UiThreadTest
public void testActivityScenarioIncReset() {
actualTest.testActivityScenarioIncReset();
}
...
}
|
Having a modular architecture, such as model-view-adapter, enables us to test most of the application components in isolation. For example, our simple unit tests for the POJO bounded counter model still work in the context of the overall Android app.
Interactive Behaviors and Implicit Concurrency with Internal Timers
Learning objectives
- Internal events from autonomous timer-based behavior (C)
- Modeling recurring and one-shot timers in UML State Machine diagrams (A)
- Modeling execution scenarios with UML Collaboration diagrams (A)
- Distinguishing between view states and (behavioral) model states (C)
- Implementing state-dependent behavior using the State pattern (A)
- Managing complexity in application architecture (C)
- Distinguishing among passive, reactive, and autonomous model components (C)
- The Model-View-Adapter pattern with autonomous model behavior (C)
- Testing components with autonomous behavior and dependencies (A)
Introduction
In this section, we’ll study an application that has richer, timer-based behaviors compared to the click counter example from the previous section. Our example will be a countdown timer for cooking and similar scenarios where we want to be notified when a set amount of time has elapsed.
The functional requirements for a countdown timer
Let’s start with the functional requirements for the countdown timer, amounting to a fairly abstract description of its controls and behavior.
The timer exposes the following controls:
- One two-digit display of the form 88.
- One multi-function button.
The timer behaves as follows:
- The timer always displays the remaining time in seconds.
- Initially, the timer is stopped and the (remaining) time is zero.
- If the button is pressed when the timer is stopped, the time is incremented by one up to a preset maximum of 99. (The button acts as an increment button.)
- If the time is greater than zero and three seconds elapse from the most recent time the button was pressed, then the timer beeps once and starts running.
- While running, the timer subtracts one from the time for every second that elapses.
- If the timer is running and the button is pressed, the timer stops and the time is reset to zero. (The button acts as a cancel button.)
- If the timer is running and the time reaches zero by itself (without the button being pressed), then the timer stops counting down, and the alarm starts beeping continually and indefinitely.
- If the alarm is sounding and the button is pressed, the alarm stops sounding; the timer is now stopped and the (remaining) time is zero. (The button acts as a stop button.)
A graphical user interface (GUI) for a countdown timer
Our next step is to flesh out the GUI for our timer. For usability, we’ll label the multifunction button with its current function. We’ll also indicate which state the timer is currently in.
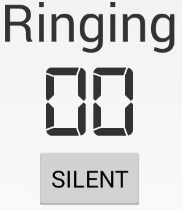
The following screenshots show the default scenario where we start up the timer, add a few seconds, wait for it to start counting down, and ultimately reach the alarm state.
Modeling the interactive behavior
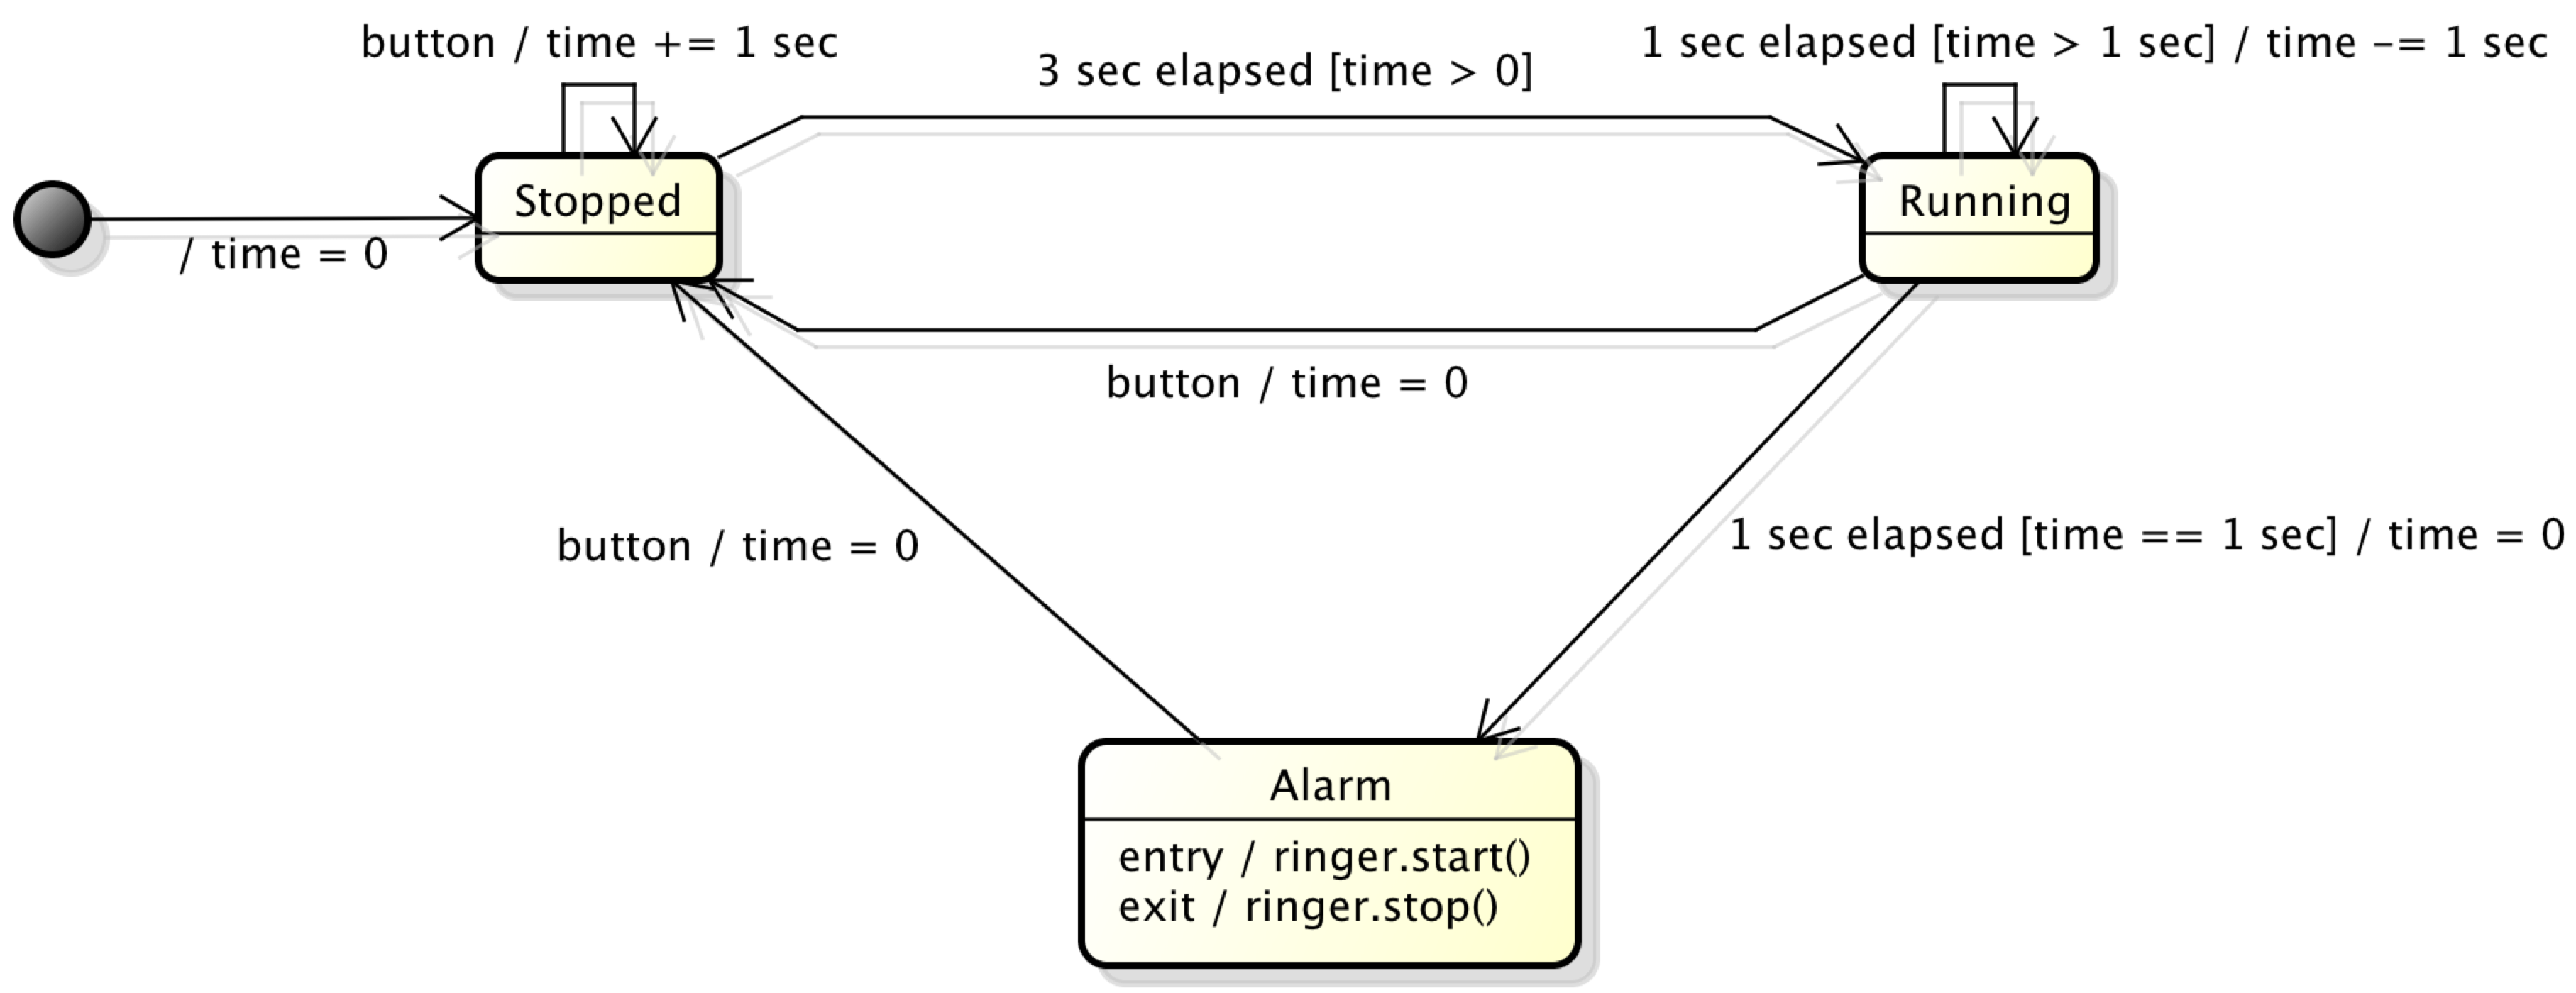
The UML state machine diagram modeling the dynamic behavior of the countdown timer application.
Let’s again try to describe the abstract behavior of the countdown timer using a UML state machine diagram. As usual, there are various ways to do this, and our guiding principle is to keep things simple and close to the informal description of the behavior.
It is easy to see that we need to represent the current counter value. Once we accept this, we really don’t need to distinguish between the stopped state (with counter value zero) and the counting state (with counter value greater than zero). The other states that arise naturally are the running state and the alarm state.
As in the click counter example, these model states map directly to the view states shown above. Again, the differences among the view states are very minor and are aimed mostly at usability: A properly labeled button is a much more effective affordance than an unlabeled or generically labeled one.
Note that there are two types of (internal) timers at work here:
- one-shot timers, such as the three-second timer in the stopped state that gets restarted every time we press the multifunction button to add time
- recurring timers, such as the one-second timer in the running state that fires continually for every second that goes by
Implementing time-based autonomous behavior
While the entirely passive bounded counter behavior from the previous section was straightforward to implement, the countdown timer includes autonomous timer-based behaviors that give rise to another level of complexity.
There are different ways to deal with this behavioral complexity. Given that we have already expressed the behavior as a state machine, we can use the State software design pattern to separate state-dependent behavior from overarching handling of external and internal triggers and actions.
We start by defining a state abstraction. Besides the same common methods and reference to its surrounding state machine, each state has a unique identifier.
1 2 3 4 5 6 7 8 9 10 11 12 13 14 | abstract class TimerState implements TimerUIListener, ClockListener {
public TimerState(final TimerStateMachine sm) { this.sm = sm; }
protected final TimerStateMachine sm;
@Override public final void onStart() { onEntry(); }
public void onEntry() { }
public void onExit() { }
public void onButtonPress() { }
public void onTick() { }
public void onTimeout() { }
public abstract int getId();
}
|
In addition, a state receives UI events and clock ticks. Accordingly, it implements the corresponding interfaces, which are defined as follows:
1 2 3 4 | public interface TimerUIListener {
void onStart();
void onButtonPress();
}
|
1 2 3 4 | public interface ClockListener {
void onTick();
void onTimeout();
}
|
As we discussed in section Basic Event-Based User Interaction, Android follows an event source/listener naming idiom. As our examples illustrate, it is straightforward to define custom app-specific events that follow this same convention. Our ClockListener, for example, combines two kinds of events within a single interface.
Concrete state classes implement the abstract TimerState class. The key parts of the state machine implementation follow:
1 2 3 4 5 6 7 8 9 10 | private TimerState state = new TimerState(this) { // intial pseudo-state
@Override public int getId() { throw new IllegalStateException(); }
};
protected void setState(final TimerState nextState) {
state.onExit();
state = nextState;
uiUpdateListener.updateState(state.getId());
state.onEntry();
}
|
Let’s focus on the stopped state first. In this state, neither is the clock ticking, nor is the alarm ringing. On every button press, the remaining running time goes up by one second and the one-shot three-second idle timeout starts from zero. If three seconds elapse before another button press, we transition to the running state.
1 2 3 4 5 6 7 8 9 | private final TimerState STOPPED = new TimerState(this) {
@Override public void onEntry() { timeModel.reset(); updateUIRuntime(); }
@Override public void onButtonPress() {
clockModel.restartTimeout(3 /* seconds */);
timeModel.inc(); updateUIRuntime();
}
@Override public void onTimeout() { setState(RUNNING); }
@Override public int getId() { return R.string.STOPPED; }
};
|
Let’s now take a look at the running state. In this state, the clock is ticking but the alarm is not ringing. With every recurring clock tick, the remaining running time goes down by one second. If it reaches zero, we transition to the ringing state. If a button press occurs, we stop the clock and transition to the stopped state.
1 2 3 4 5 6 7 8 9 10 | private final TimerState RUNNING = new TimerState(this) {
@Override public void onEntry() { clockModel.startTick(1 /* second */); }
@Override public void onExit() { clockModel.stopTick(); }
@Override public void onButtonPress() { setState(STOPPED); }
@Override public void onTick() {
timeModel.dec(); updateUIRuntime();
if (timeModel.get() == 0) { setState(RINGING); }
}
@Override public int getId() { return R.string.RUNNING; }
};
|
Finally, in the ringing state, nothing is happening other than the alarm ringing. If a button press occurs, we stop the alarm and transition to the stopped state.
1 2 3 4 5 6 | private final TimerState RINGING = new TimerState(this) {
@Override public void onEntry() { uiUpdateListener.ringAlarm(true); }
@Override public void onExit() { uiUpdateListener.ringAlarm(false); }
@Override public void onButtonPress() { setState(STOPPED); }
@Override public int getId() { return R.string.RINGING; }
};
|
Managing structural complexity
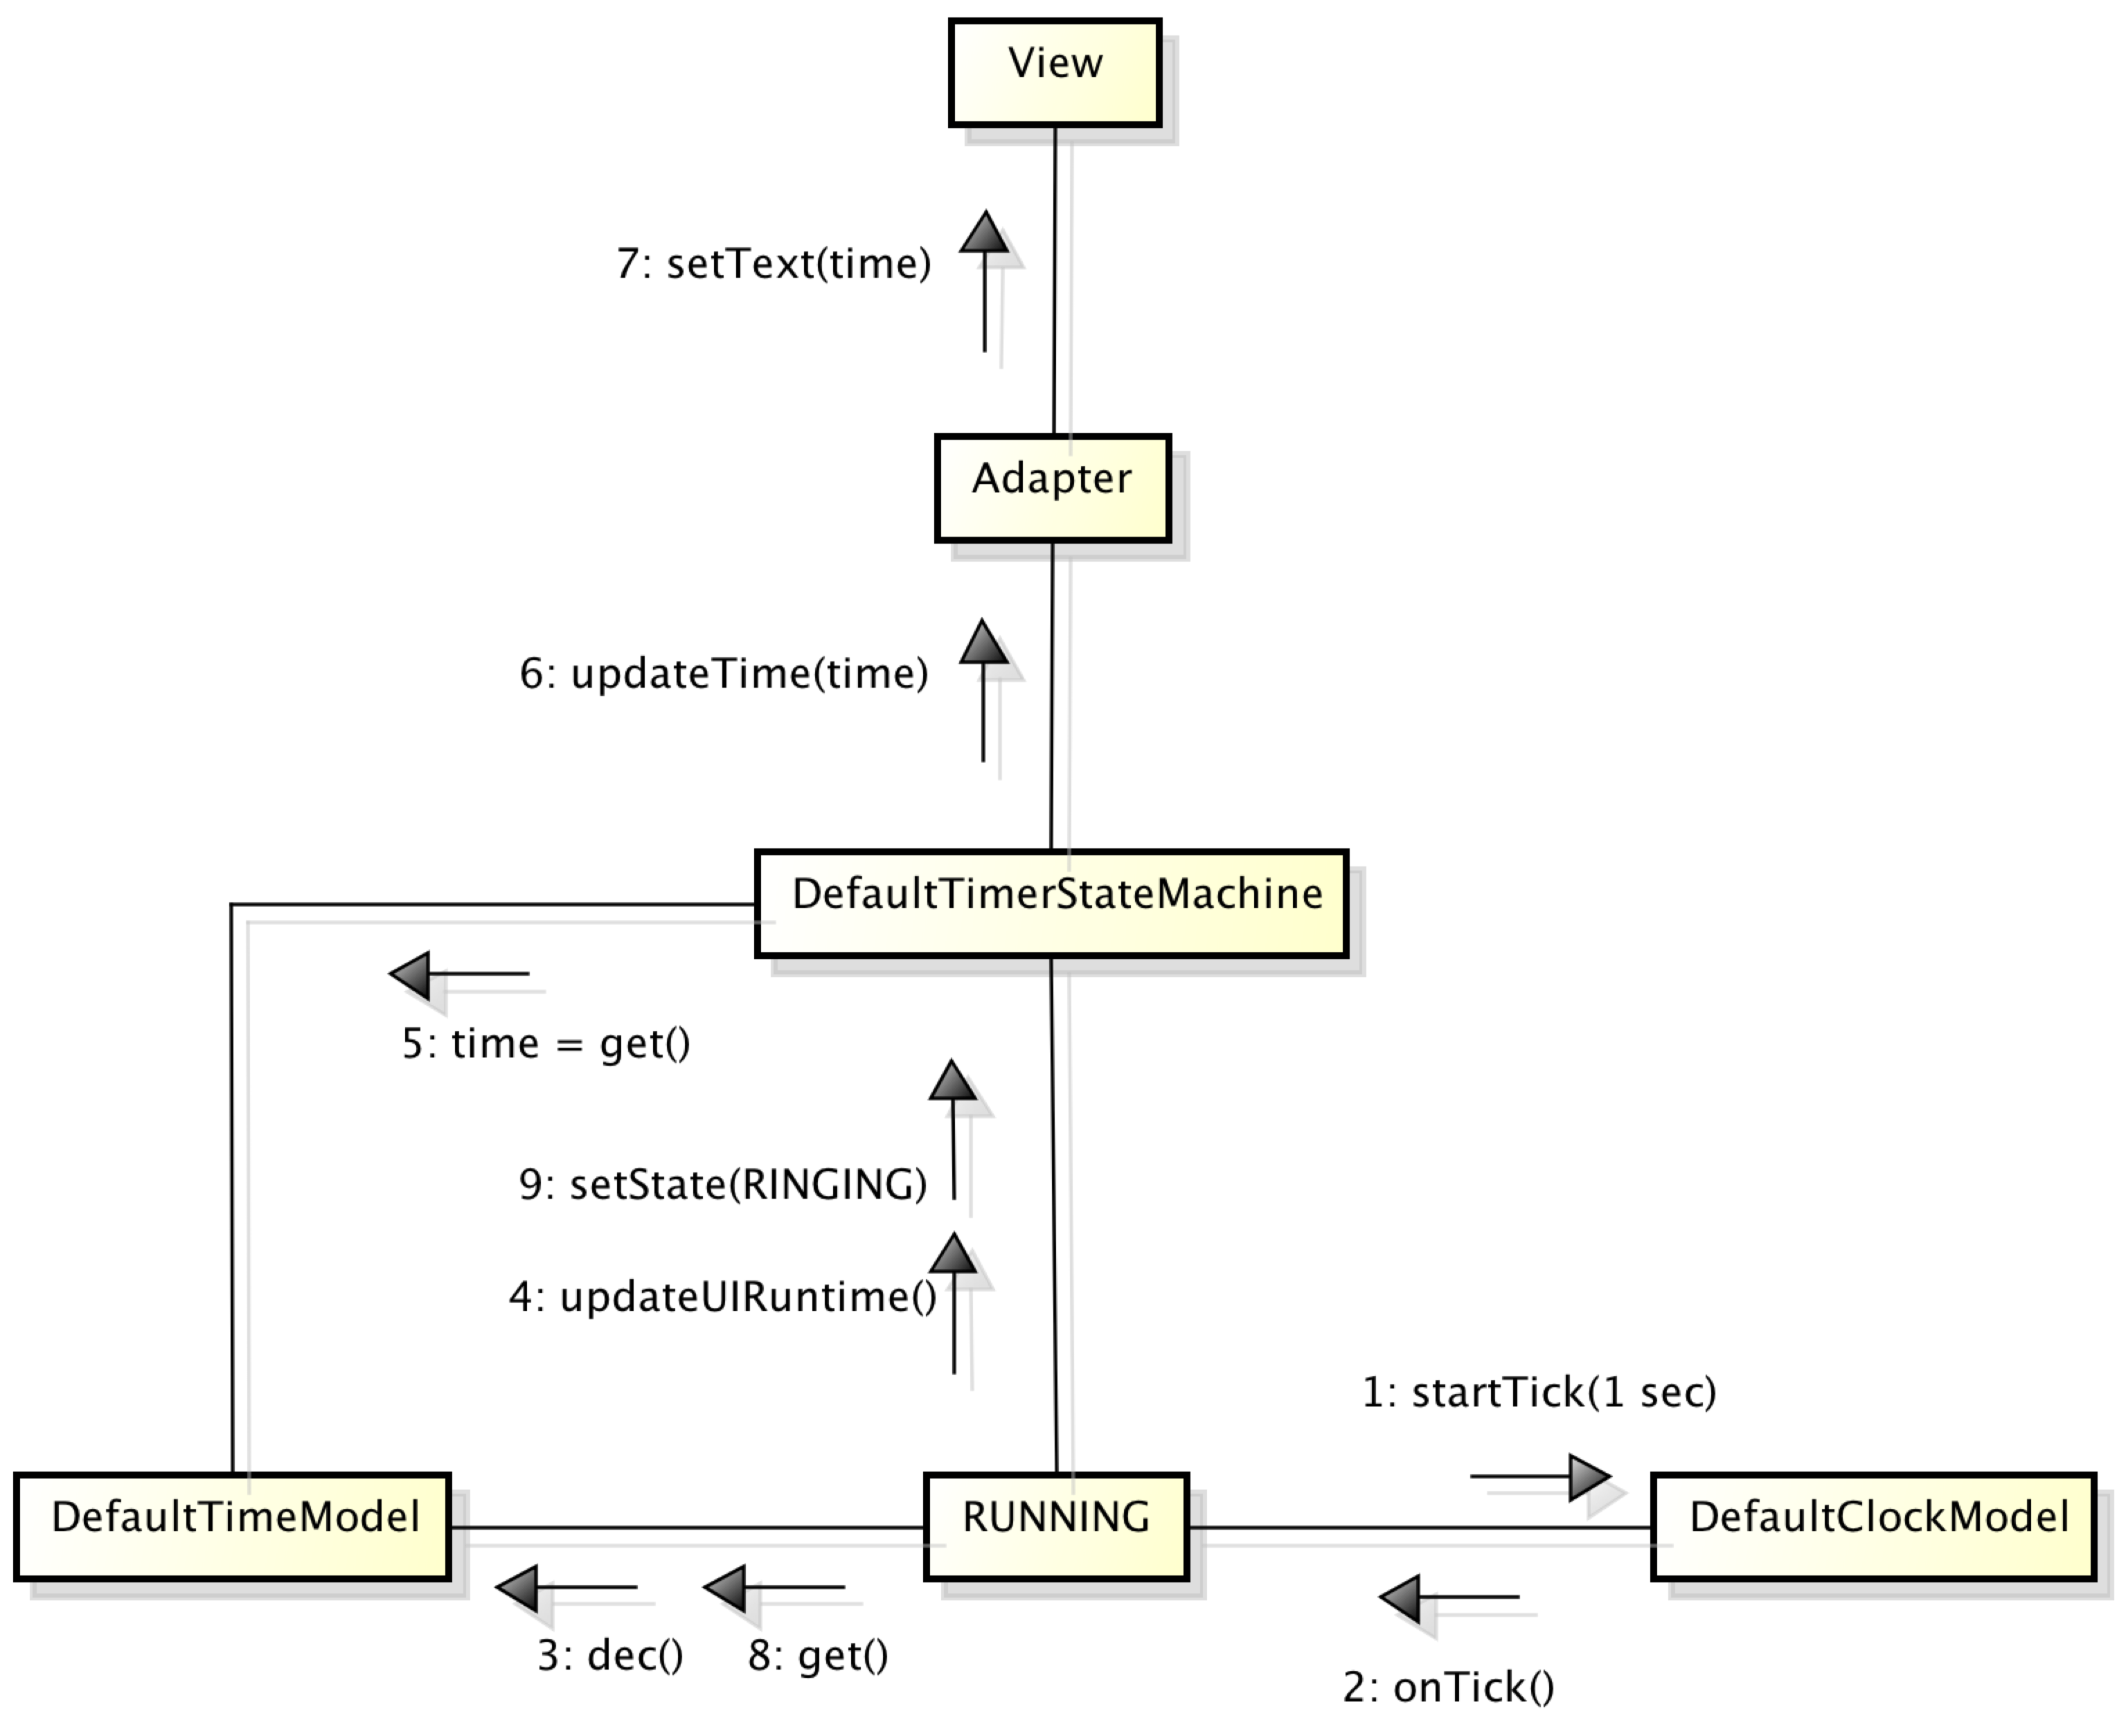
We can again describe the architecture of the countdown timer Android app as an instance of the Model-View-Adapter (MVA) architectural pattern. In figure Countdown timer: Model-View-Adapter architecture, solid arrows represent (synchronous) method invocation, and dashed arrows represent (asynchronous) events. Here, both the view components and the model’s autonomous timer send events to the adapter.
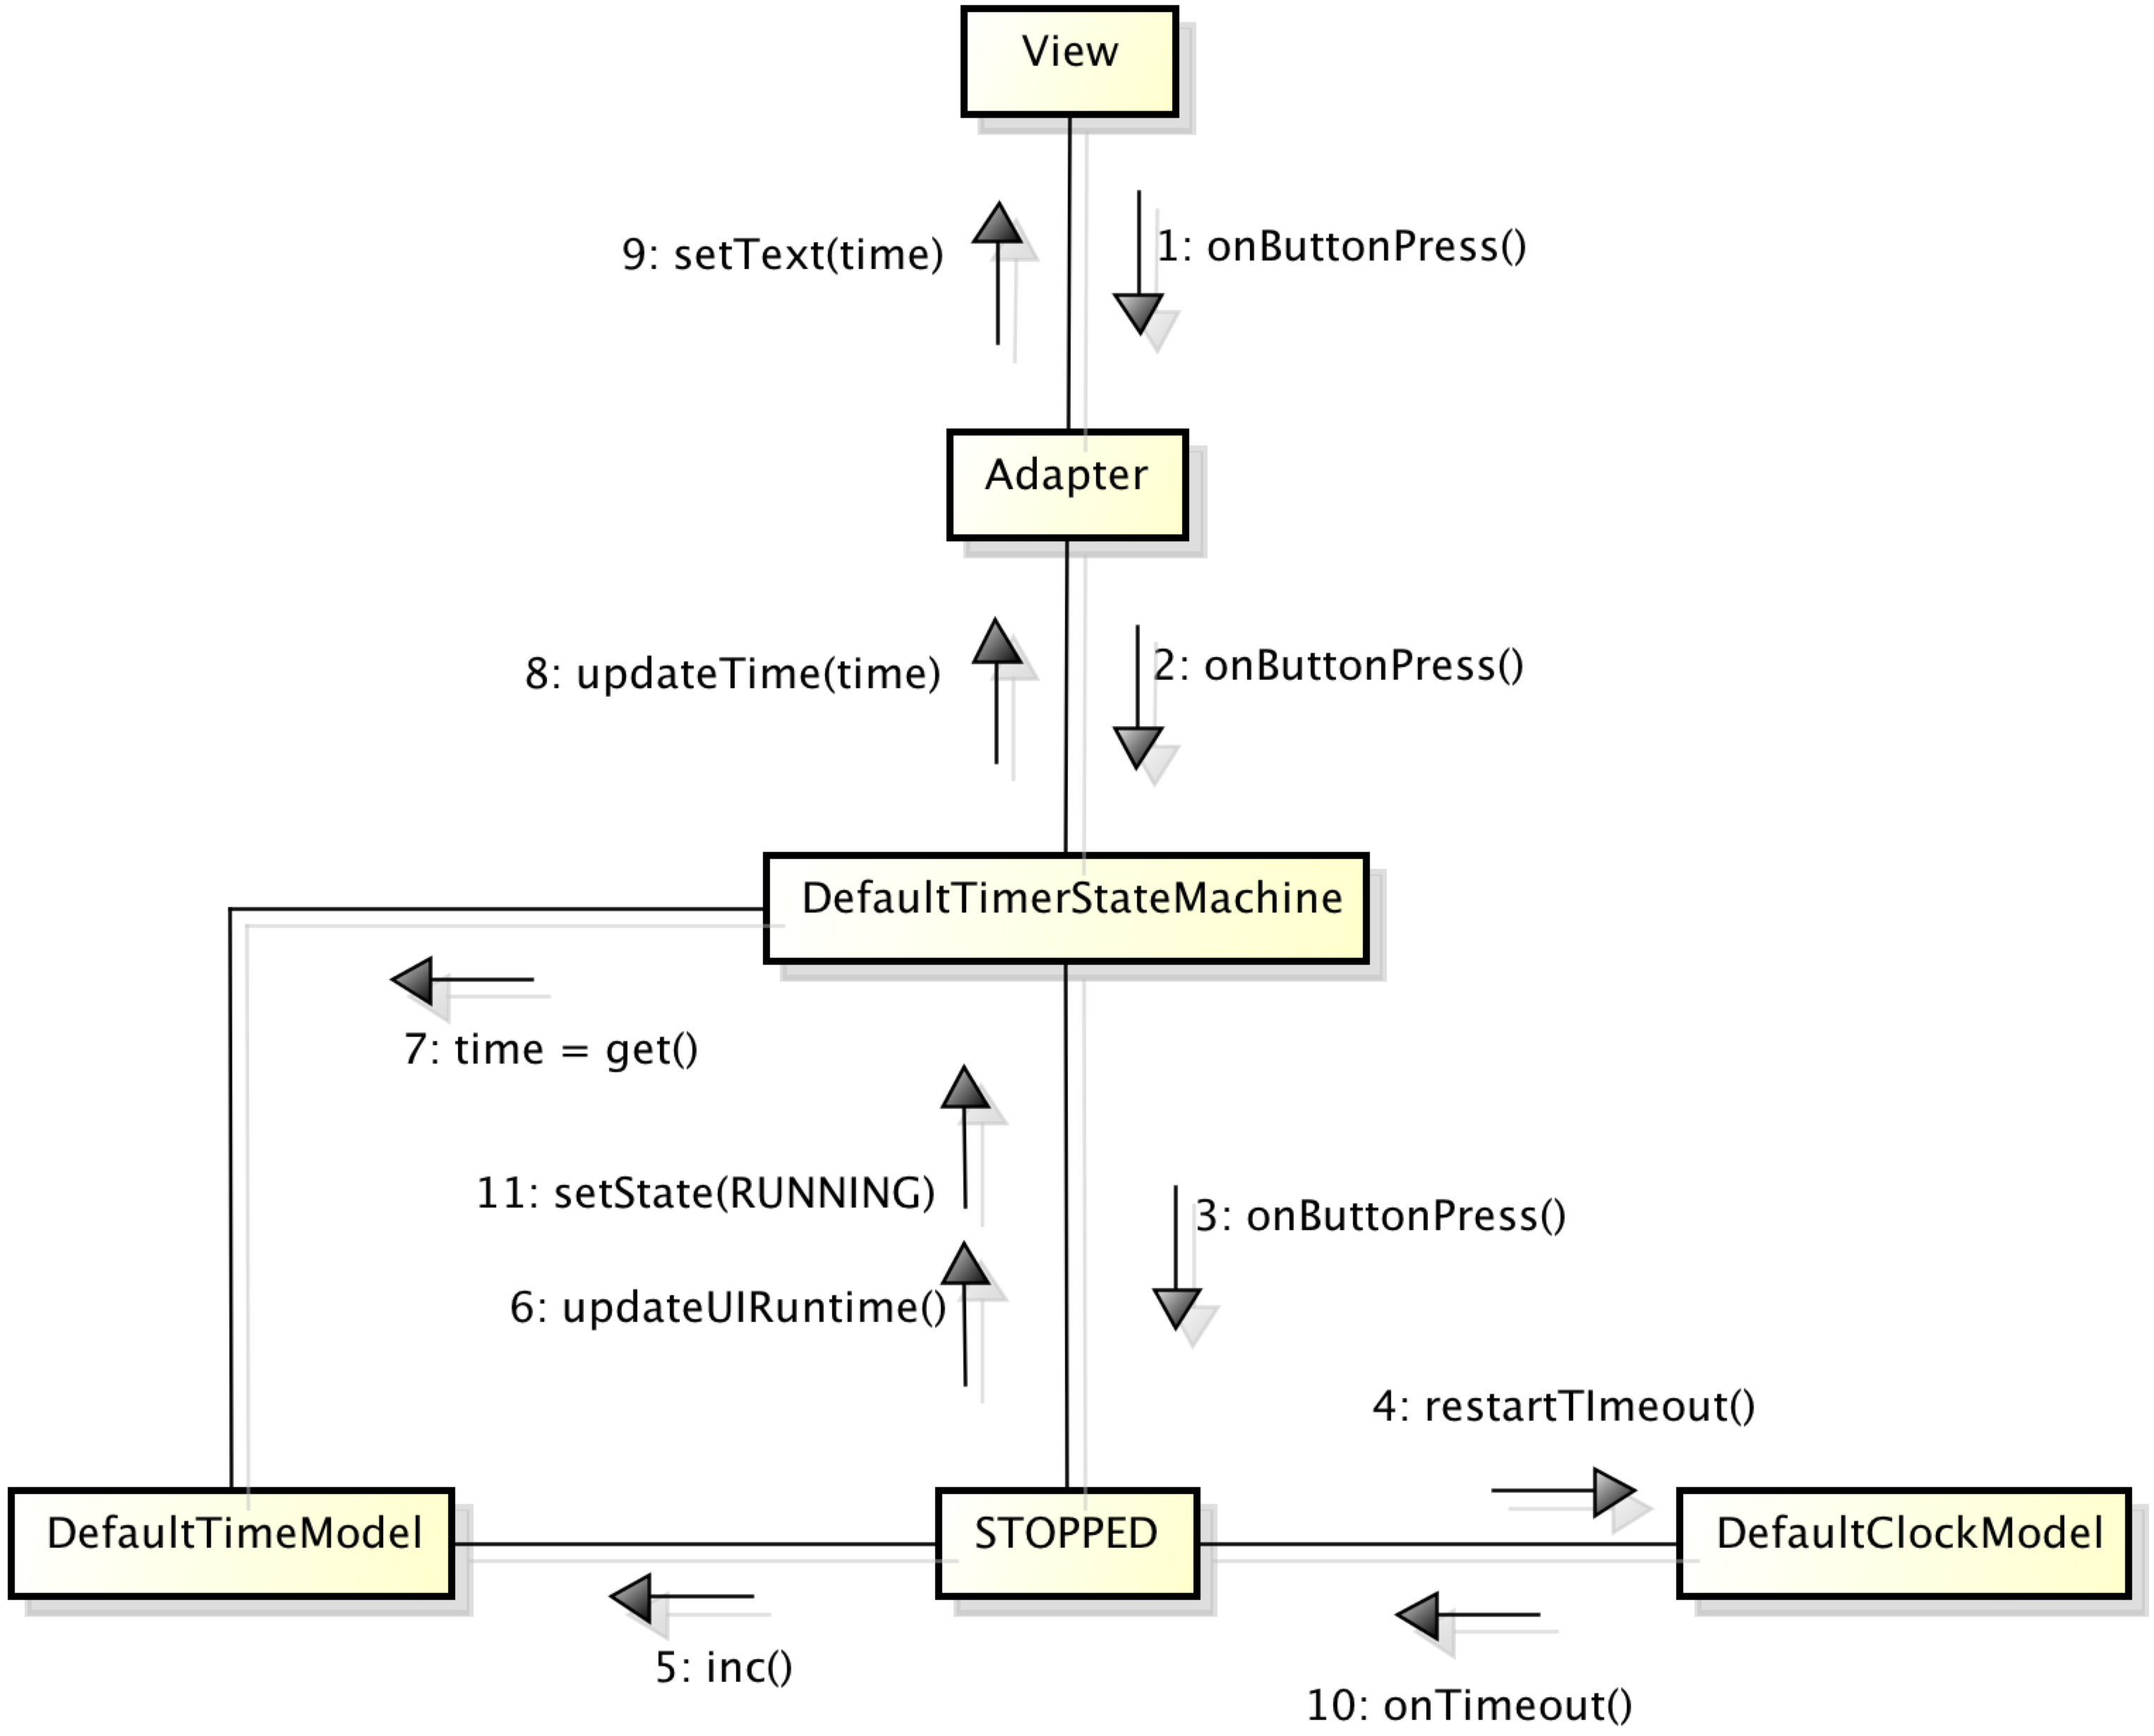
Figures Countdown timer: user input scenario and Countdown timer: autonomous scenario illustrate the two main interaction scenarios side-by-side.
The user input scenario illustrates the system’s end-to-end response to a button press. The internal timeout gets set in response to a button press. When the timeout event actually occurs, corresponding to an invocation of the onTimeout method, the system responds by transitioning to the running state.
By contrast, the autonomous scenario shows the system’s end-to-end response to a recurring internal clock tick, corresponding to an invocation of the onTick method. When the remaining time reaches zero, the system responds by transitioning to the alarm-ringing state.
Testing more complex GUI applications
As we develop more complex applications, we increasingly benefit from thorough automated testing. In particular, there are different structural levels of testing: component-level unit testing, integration testing, and system testing.
In addition, as our application grows in complexity, so does our test code, so it makes sense to use good software engineering practice in the development of our test code. Accordingly, software design patterns for test code have emerged, such as the Testclass Superclass pattern [XUnitPatterns] we use in section Basic Event-Based User Interaction.
Unit-testing passive model components
The time model is simple passive component, so we can test it very similarly as the bounded counter model in section Basic Event-Based User Interaction.
Unit-testing components with autonomous behavior
Testing components with autonomous behavior is more challenging because we have to attach some kind of probe to observe the behavior.
Let’s try this on our clock model. The following test verifies that a stopped clock does not emit any tick events.
1 2 3 4 5 6 7 8 9 10 | @Test
public void testStopped() throws InterruptedException {
final AtomicInteger i = new AtomicInteger(0);
model.setClockListener(new ClockListener() {
@Override public void onTick() { i.incrementAndGet(); }
@Override public void onTimeout() { }
});
Thread.sleep(5500);
assertEquals(0, i.get());
}
|
And this one verifies that a running clock emits roughly one tick event per second.
1 2 3 4 5 6 7 8 9 10 11 12 | @Test
public void testRunning() throws InterruptedException {
final AtomicInteger i = new AtomicInteger(0);
model.setClockListener(new ClockListener() {
@Override public void onTick() { i.incrementAndGet(); }
@Override public void onTimeout() { }
});
model.startTick(1 /* second */);
Thread.sleep(5500);
model.stopTick();
assertEquals(5, i.get());
}
|
Unit-testing components with complex dependencies
Some model components have complex dependencies. Our timer’s state machine model, e.g., expects implementations of the interfaces TimeModel, ClockModel, and TimerUIUpdateListener to be present. We can achieve this by manually implementing a so-called mock object that unifies these three dependencies of the timer state machine model, corresponding to the three interfaces this mock object implements.
1 2 3 4 5 6 7 8 9 10 11 12 13 14 15 16 17 18 19 20 21 22 23 24 25 26 27 | class UnifiedMockDependency implements TimeModel, ClockModel, TimerUIUpdateListener {
private int timeValue = -1, stateId = -1;
private int runningTime = -1, idleTime = -1;
private boolean started = false, ringing = false;
public int getTime() { return timeValue; }
public int getState() { return stateId; }
public boolean isStarted() { return started; }
public boolean isRinging() { return ringing; }
@Override public void updateTime(final int timeValue) { this.timeValue = timeValue; }
@Override public void updateState(final int stateId) { this.stateId = stateId; }
@Override public void ringAlarm(boolean b) { ringing = b; }
@Override public void setClockListener(ClockListener listener) {
throw new UnsupportedOperationException();
}
@Override public void startTick(final int period) { started = true; }
@Override public void stopTick() { started = false; }
@Override public void restartTimeout(final int period) { }
@Override public void reset() { runningTime = 0; }
@Override public void inc() { if (runningTime != 99) { runningTime++; } }
@Override public void dec() { if (runningTime != 0) { runningTime--; } }
@Override public int get() { return runningTime; }
}
|
The instance variables and corresponding getters enable us to test whether the SUT produced the expected state changes in the mock object. The three remaining blocks of methods correspond to the three implemented interfaces, respectively.
Now we can write tests to verify actual scenarios. In the following scenario, time is 0, press button once, expect time 1, press button 198 times (the max time is 99), expect time 99, wait 3 seconds, check if running, wait 50 seconds, expect time 49 (99-50), wait 49 seconds, expect time 0, check if ringing, wait 3 more seconds (just in case), check if still ringing, press button to turn off ring, make sure ringing stopped and state is stopped.
1 2 3 4 5 6 7 8 9 10 11 12 13 14 15 16 17 18 19 20 21 22 23 | @Test
public void testScenarioRun2() {
assertEquals(R.string.STOPPED, dependency.getState());
model.onButtonPress();
assertTimeEquals(1);
assertEquals(R.string.STOPPED, dependency.getState());
onButtonRepeat(MAX_TIME * 2);
assertTimeEquals(MAX_TIME);
onTickRepeat(3);
assertEquals(R.string.RUNNING, dependency.getState());
onTickRepeat(50);
assertTimeEquals(MAX_TIME - 50);
onTickRepeat(49);
assertTimeEquals(0);
assertEquals(R.string.RINGING, dependency.getState());
assertTrue(dependency.isRinging());
onTickRepeat(3);
assertEquals(R.string.RINGING, dependency.getState());
assertTrue(dependency.isRinging());
model.onButtonPress();
assertFalse(dependency.isRinging());
assertEquals(R.string.STOPPED, dependency.getState());
}
|
Note that this happens in fake time (fast-forward) because we can make the rate of the clock ticks as fast as the state machine can keep up.
Note
There are also various mocking frameworks, such as Mockito and JMockit, which can automatically generate mock objects that represent component dependencies from interfaces and provide APIs or domain-specific languages for specifying test expectations.
Programmatic system testing of the app
The following is a system test of the application with all of its real component present. It verifies the following scenario in real time: time is 0, press button five times, expect time 5, wait 3 seconds, expect time 5, wait 3 more seconds, expect time 2, press stopTick button to reset time, expect time 0. (includes all state transitions as assertions).
1 2 3 4 5 6 7 8 9 10 11 12 13 14 15 16 17 18 19 20 21 22 23 24 25 | @Test
public void testScenarioRun2() throws Throwable {
getActivity().runOnUiThread(new Runnable() { @Override public void run() {
assertEquals(STOPPED, getStateValue());
assertEquals(0, getDisplayedValue());
for (int i = 0; i < 5; i++) {
assertTrue(getButton().performClick());
}
assertEquals(5, getDisplayedValue());
}});
Thread.sleep(3200); // <-- do not run this in the UI thread!
runUiThreadTasks();
getActivity().runOnUiThread(new Runnable() { @Override public void run() {
assertEquals(RUNNING, getStateValue());
assertEquals(5, getDisplayedValue());
}});
Thread.sleep(3200);
runUiThreadTasks();
getActivity().runOnUiThread(new Runnable() { @Override public void run() {
assertEquals(RUNNING, getStateValue());
assertEquals(2, getDisplayedValue());
assertTrue(getButton().performClick());
assertEquals(STOPPED, getStateValue());
}});
}
|
As in section Basic Event-Based User Interaction, we can run this test as an in-container instrumentation test or out-of-container using a simulated environment such as Robolectric.
Keeping the User Interface Responsive with Asynchronous Activities
Learning objectives
- Designing responsive interactive applications (A)
- Design choices for user interface toolkits such as Android (C)
- The difference between events and activities (C)
- Using asynchronous tasks for long-running activities (A)
- Reporting progress to the user (A)
- Responding to cancelation requests (A)
Introduction
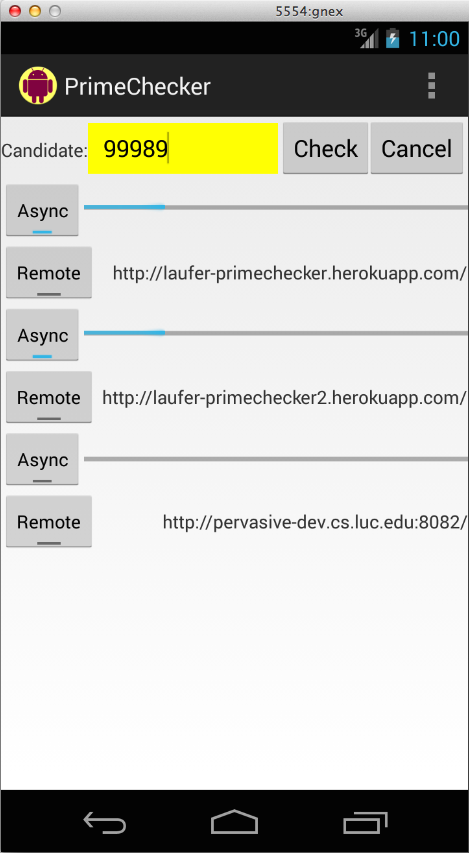
In this section, we’ll explore the issues that arise when we use a GUI to control long-running, processor-bound activities. In particular, we’ll want to make sure the GUI stays responsive even in such scenarios and the activity supports progress reporting and cancelation. Our running example will be a simple app for checking whether a number is prime.
The functional requirements for the prime checker app
The functional requirements for this app are as follows: The app allows us to enter a number in a text field. When we press the “check” button, the app checks whether the number we entered is prime. When we press the “cancel” button, the ongoing check(s) are discontinued.
To check whether a number is prime, we can use this brute-force algorithm.
1 2 3 4 5 6 7 8 9 | protected boolean isPrime(final long i) {
if (i < 2) return false;
final long half = i / 2;
for (long k = 2; k <= half; k += 1) {
if (isCancelled() || i % k == 0) return false;
publishProgress((int) (k * 100 / half));
}
return true;
}
|
For now, let’s ignore the isCancelled and updateProgress methods and agree to discuss their significance later in this section.
While this is not a good prime checker implementation, the app will allow us to explore and discuss different ways to run one or more such checks. In particular, the fact that the algorithm hogs the processor makes it an effective running example for discussing whether to move processor-bound activities to the background (or remote servers).
Note
In this chapter, we focus on tasks that run locally in the foreground or background. In a future submission, we will explore the possibility of offloading compute- and storage-intensive tasks to remote web services.
The problem with foreground tasks
As a first attempt, we now can run the isPrime method from within our event listener in the current thread of execution (the main GUI thread).
1 2 3 4 5 6 | final PrimeCheckerTask t = new PrimeCheckerTask(progressBars[0], input);
localTasks.add(t);
t.onPreExecute();
final boolean result = t.isPrime(number);
t.onPostExecute(result);
localTasks.clear();
|
The methods onPreExecute and onPostExecute are for resetting the user interface and displaying the result.
This approach works for very small numbers. For larger numbers, however, the user interface freezes noticeably while the prime number check is going on, so it does not respond to pressing the cancel button. There is no progress reporting either: The progress bar jumps from zero to 100 when the check finishes.
The single-threaded user interface model
The behavior we are observing is a consequence of Android’s design decision to keep the user interface single-threaded. In this design, all UI events, including user inputs such as button presses and mouse moves, outputs such as changes to text fields, progress bar updates, and other component repaints, and internal timers, are processed sequentially by a single thread, known in Android as the main thread (or UI thread). We will say UI thread for greater clarity.
To process an event completely, the UI thread needs to dispatch the event to any event listener(s) attached to the event source component. Accordingly, single-threaded UI designs typically come with two rules:
- To ensure responsiveness, code running on the UI thread must never block.
- To ensure thread-safety, only code running on the UI thread is allowed to access the UI components.
In interactive applications, running for a long time is almost as bad as blocking indefinitely on, say, user input. To understand exactly what is happening, let’s focus on the point that events are processed sequentially in our scenario of entering a number and attempting to cancel the ongoing check.
- The user enters the number to be checked.
- The user presses the check button.
- To process this event, the UI thread runs the attached listener, which checks whether the number is prime.
- While the UI thread running the listener, all other incoming UI events—pressing the cancel button, updating the progress bar, changing the background color of the input field, etc.—are queued sequentially.
- Once the UI thread is done running the listener, it will process the remaining events on the queue. At this point, the cancel button has no effect anymore, and we will instantly see the progress bar jump to 100% and the background color of the input field change according to the result of the check.
So why doesn’t Android simply handle incoming events concurrently, say, each in its own thread? The main reason not to do this is that it greatly complicates the design while at the same time sending us back to square one in most scenarios: Because the UI components are a shared resource, to ensure thread safety in the presence of race conditions to access the UI, we would now have to use mutual exclusion in every event listener that accesses a UI component. Because that is what event listener typically do, in practice, mutual exclusion would amount to bringing back a sequential order. So we would have greatly complicated the whole model without achieving significantly greater concurrency in our system.
Note
Many other GUI toolkits, such as Java Swing, are also based on a single-threaded design for similar reasons as Android. There are also single-threaded server designs. The software design pattern common to these designs is known as Reactor [POSA2].
There are two main approaches to keeping the UI from freezing while a long-running activity is going on.
Breaking up an activity into small units of work
The first approach is still single-threaded: We break up the long-running activity into very small units of work to be executed directly by the event-handling thread. When the current chunk is about to finish, it schedules the next unit of work for execution on the event-handling thread. Once the next unit of work runs, it first checks whether a cancelation request has come in. If so, it simply will not continue, otherwise it will do its work and then schedule its successor. This approach allows other events, such as reporting progress or pressing the cancel button, to get in between two consecutive units of work and will keep the UI responsive as long as each unit executes fast enough.
Now, in the same scenario as above—entering a number and attempting to cancel the ongoing check—the behavior will be much more responsive:
- The user enters the number to be checked.
- The user presses the check button.
- To process this event, the UI thread runs the attached listener, which makes a little bit of progress toward checking whether the number is prime and then schedules the next unit of work on the event queue.
- Meanwhile, the user has pressed the cancel button, so this event is on the event queue before the next unit of work toward checking the number.
- Once the UI thread is done running the first (very short) unit of work, it will run the event listener attached to the cancel button, which will prevent further units of work from running.
Asynchronous tasks to the rescue
The second approach is typically multi-threaded: We represent the entire activity as a separate asynchronous task. Because this is such a common scenario, Android provides the abstract class AsyncTask for this purpose.
1 2 3 4 5 6 7 8 9 10 11 | public abstract class AsyncTask<Params, Progress, Result> {
protected void onPreExecute() { }
protected abstract Result doInBackground(Params... params);
protected void onProgressUpdate(Progress... values) { }
protected void onPostExecute(Result result) { }
protected void onCancelled(Result result) { }
protected final void publishProgress(Progress... values) { ... }
public final boolean isCancelled() { ... }
public final AsyncTask<...> executeOnExecutor(Executor exec, Params... params) { ... }
public final boolean cancel(boolean mayInterruptIfRunning) { ... }
}
|
The three generic type parameters are Params, the type of the arguments of the activity; Progress, they type of the progress values reported while the activity runs in the background, and Result, the result type of the background activity. Not all three type parameters have to be used, and we can use the type Void to mark a type parameter as unused.
When an asynchronous task is executed, the task goes through the following lifecycle:
- onPreExecute runs on the UI thread and is used to set up the task in a thread-safe manner.
- doInBackground(Params...) performs the actual task. Within this method, we can report progress using publishProgress(Progress...) and check for cancelation using isCancelled().
- onProgressUpdate(Progress...) is scheduled on the UI thread whenever the background task reports progress and runs whenever the UI thread gets to this event. Typically, we use this method to advance the progress bar or display progress to the user in some other form.
- onPostExecute(Result), receives the result of the background task as an argument and runs on the UI thread after the background task finishes.
Using AsyncTask in the prime number checker
We set up the corresponding asynchronous task with an input of type Long, progress of type Integer, and result of type Boolean. In addition, the task has access to the progress bar and input text field in the Android GUI for reporting progress and results, respectively.
1 2 3 4 5 6 7 8 9 10 | public class PrimeCheckerTask extends AsyncTask<Long, Integer, Boolean> {
private final ProgressBar progressBar;
private final TextView input;
public PrimeCheckerTask(final ProgressBar progressBar, final TextView input) {
this.progressBar = progressBar;
this.input = input;
}
|
The centerpiece of our solution is to invoke the isPrime method from the main method of the task, doInBackground. The auxiliary methods isCancelled and publishProgress we saw earlier in the implementation of isPrime are for checking for requests to cancel the current task and updating the progress bar, respectively. doInBackground and the other lifecycle methods are implemented here:
1 2 3 4 5 6 7 8 9 10 11 12 13 14 15 16 17 18 19 20 21 22 | @Override protected void onPreExecute() {
progressBar.setMax(100);
input.setBackgroundColor(Color.YELLOW);
}
@Override protected Boolean doInBackground(final Long... params) {
if (params.length != 1)
throw new IllegalArgumentException("exactly one argument expected");
return isPrime(params[0]);
}
@Override protected void onProgressUpdate(final Integer... values) {
progressBar.setProgress(values[0]);
}
@Override protected void onPostExecute(final Boolean result) {
input.setBackgroundColor(result ? Color.GREEN : Color.RED);
}
@Override protected void onCancelled(final Boolean result) {
input.setBackgroundColor(Color.WHITE);
}
|
When the user presses the cancel button in the UI, any currently running tasks are canceled using the control method cancel(boolean), and subsequent invocations of isCancelled return false; as a result, the isPrime method returns on the next iteration.
How often to check for cancelation attempts is a matter of experimentation: Typically, it is sufficient to check only every so many iterations to ensure that the task can make progress on the actual computation. Note how this design decision is closely related to the granularity of the units of work in the single-threaded design discussed in _sec_SingleThreaded above.
What remains is to schedule the resulting AsyncTask on a suitable executor object:
1 2 3 4 | final PrimeCheckerTask t =
new PrimeCheckerTask(progressBars[i], input);
localTasks.add(t);
t.executeOnExecutor(AsyncTask.THREAD_POOL_EXECUTOR, number);
|
This completes the picture of moving long-running activities out of the UI thread but in a way that they can still be controlled by the UI thread.
Summary
In this chapter, we have studied various parallel and distributed computing topics from a user-centric software development angle. Specifically, in the context of mobile application development, we have studied the basic building blocks of interactive applications in the form of events, timers, and asynchronous activities, along with related software modeling, architecture, and design topics.
The complete source code for the examples from this chapter is available from [CS313Ex]. For further reading on designing concurrent object-oriented software, have a look at [HPJPC], [CPJ2E], and [JCP].
Todo
end of section summaries, Q&A/FAQ, questions to ponder/exercises?
Todo
Key takeaways: derive from stated learning outcomes.
Acknowledgments
We are grateful to our graduate students Michael Dotson and Audrey Redovan for having contributed their countdown timer implementation.
| [Android] | Google. 2009-2014. Android Developer Reference. http://developer.android.com/develop. |
| [APPP] | Robert C. Martin and Micah Martin. 2006. Agile Principles, Patterns, and Practices in C# (Robert C. Martin). Prentice Hall PTR, Upper Saddle River, NJ, USA. |
| [Ashton2009] | Kevin Ashton. 2009. That ‘Internet of Things’ Thing. RFID Journal, 22. Juli 2009. http://www.rfidjournal.com/articles/view?4986 |
| [Christensen2009] | Jason H. Christensen. 2009. Using RESTful web-services and cloud computing to create next generation mobile applications. In Proceedings of the 24th ACM SIGPLAN conference companion on Object oriented programming systems languages and applications (OOPSLA ‘09). ACM, New York, NY, USA, 627-634. DOI=10.1145/1639950.1639958 http://doi.acm.org/10.1145/1639950.1639958 |
| [CPJ2E] | Doug Lea. 1999. Concurrent Programming in Java. Second Edition: Design Principles and Patterns (2nd ed.). Addison-Wesley Longman Publishing Co., Inc., Boston, MA, USA. |
| [CS313Ex] | Konstantin Läufer, George K. Thiruvathukal, and Robert H. Yacobellis. LUC CS COMP 313/413 Examples. https://bitbucket.org/loyolachicagocs_comp313. |
| [GOF] | Erich Gamma, Richard Helm, Ralph Johnson, and John Vlissides. 1995. Design Patterns: Elements of Reusable Object-Oriented Software. Addison-Wesley Professional. |
| [HPJPC] | Thomas W. Christopher and George K. Thiruvathukal, High Performance Java Platform Computing, Prentice Hall PTR and Sun Microsystems Press, 2000. |
| [JCP] | Tim Peierls, Brian Goetz, Joshua Bloch, Joseph Bowbeer, Doug Lea, and David Holmes. 2005. Java Concurrency in Practice. Addison-Wesley Professional. |
| [JavaBeans] | Oracle Inc. JavaBeans 1.0.1 Specification. http://www.oracle.com/technetwork/java/javase/documentation/spec-136004.html |
| [MVA] | Palantir. Model-View-Adapter. http://www.palantir.com/2009/04/model-view-adapter/ |
| [OS] | Per Brinch Hansen. 1973. Operating System Principles. Prentice-Hall, Inc., Upper Saddle River, NJ, USA. |
| [POSA2] | Douglas C. Schmidt, Michael Stal, Hans Rohnert, and Frank Buschmann. 2000. Pattern-Oriented Software Architecture: Patterns for Concurrent and Networked Objects (2nd ed.). John Wiley & Sons, Inc., New York, NY, USA. |
| [TDD] | Beck, Kent. 2002. Test Driven Development: By Example. Addison-Wesley Longman Publishing Co., Inc., Boston, MA, USA. |
| [UML] | (1, 2) James Rumbaugh, Ivar Jacobson, and Grady Booch. 2010. Unified Modeling Language Reference Manual (2nd ed.). Addison-Wesley Professional. |
| [XUnitPatterns] | Gerard Meszaros. 2007. xUnit Test Patterns: Refactoring Test Code. Addison-Wesley Longman Publishing Co., Inc., Boston, MA, USA. |
